How to Make Backups of Your iPhone via Wifi
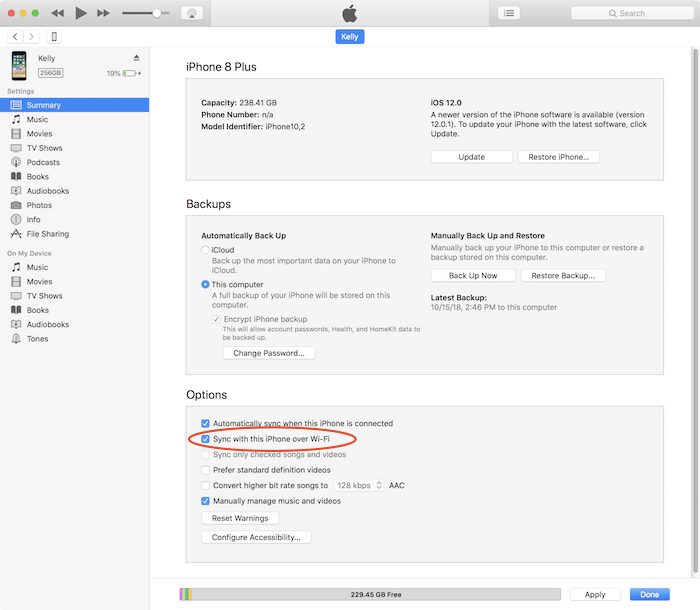
Rated (5.0 of 5.0) by 3 reviewers.iTunes has an option called "Sync with this iPhone over Wi-Fi", that allows you to interact with your iPhone (or iPad/iPod Touch) in iTunes without having the device plugged into your computer via USB cable. I think the naming of this as Wi-Fi syncing doesn't do it justice however, because the real magic is that it enables you to do iPhone backups over Wi-Fi.
Granted, if you have a lot of new data since your last backup, a Wi-Fi backup is going to take longer than a USB backup. If plugging in via USB is also an available choice, I recommend connecting via USB when possible. But still, there are times when it's necessary or more convenient to back up wirelessly.
How to enable wireless backup of your iPhone/iPad
To turn on the ability to make backups of your iPhone/iPad/iPod Touch via wifi, read and follow the following steps:
-
Plug your iOS device into your computer, and open iTunes. (Yes, you do need to plug it in once!)
-
Enter the passcode on the iOS device and click "Trust" if asked, to allow this computer permission to communicate with this iPhone/iPad.
-
Click the iPhone/iPad button in the upper left corner of iTunes to bring up the settings summary for your device.
-
Scroll down to the Options section of the settings summary screen.
-
Check the checkbox "Sync with this iPhone over Wi-Fi"

Now, when you're iPhone is awake and on the Wi-Fi network, your iPhone should appear in iTunes, so you can click "Back Up Now" as you usually would to make an iTunes backup of your iPhone.
That's it! Since iOS 6 and iTunes 11, wireless syncing is a lot more stable than it used to be, but definitely still let us know if you have questions or issues in the comments section below. If you have the device and a cable handy, you should still plug in if you plan to transfer a lot of data (like backing up a phone for the first time ever) so that the file transfer goes much more quickly.


