How do I Back Up my iPhone?
Rated (3.5 of 5.0) by 50 reviewers.April 1, 2024 at 2:25 PM
Categories: Decipher Backup Browser, Decipher TextMessage, Decipher Chat, Decipher VoiceMail | View Comments
In order to save and print iPhone text messages as a PDF, you need to make a backup of your iPhone on your computer. This FAQ guide is all about how to back up your iPhone or iPad on your Windows or Mac computer.
There are two different ways to back up your device on your Mac or Windows computer:
-
Custom "Text Messages Only" Backup - Decipher TextMessage has a custom "Back Up" option in the menu of the program. This enables you to make a backup that contains only your text message data and attachments. This option is helpful for users that have limited hard drive space on their computer and not enough room to make a full iPhone backup.
-
Back up via iTunes or the Finder - This options lets you back up your iPhone or iPad via iTunes (for Windows and legacy Mac users) or the Finder for current Mac users.
Below are specific instructions for both of these back up options, along with a short video about how to Back Up in Decipher TextMessage.
iTunes Backups
You can use iTunes to make a backup of your iPhone on a computer using the following operating systems:
- Windows 7, Windows 8, Windows 10, and Windows 11
- Mac OS X 10.10 (El Capitan), macOS 10.12 (Sierra), macOS 10.13 (High Sierra), and macOS 10.14 (Mojave)
Note: If you are on a Mac and running macOS Sonoma, Ventura, Monterey, Big Sur, or Catalina, iTunes is no longer needed to make a backup of your device on your computer. Please scroll down for the specific instructions to back up using the Finder on Sonoma, Ventura, Monterey, Big Sur, or Catalina.
To back up your iPhone or iPad, connect your phone to your Mac or PC using the USB Lightning cable provided with your iPhone/iPad and open iTunes.
After backing up your phone, you will then be able to use Decipher Tools software to save your text messages, voicemails, and other iOS data from your iPhone to your computer.
You can make a backup of your iPhone, iPad, or iPod Touch on any computer using iTunes. If you use iTunes' syncing features, the computer does not need to be the computer that you sync with.
Step 1: Bring Up the "Summary" Page for your iPhone, iPad, or iPod Touch in iTunes
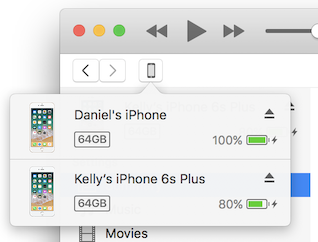
When your iOS device is plugged into your computer, you should see a device icon in the upper-left section of the iTunes window. Clicking on that device icon will bring you to the summary page for that iOS device (iPhone, iPad, or iPod Touch) or bring up a menu of multiple devices for you to select from.

If you don't see that iPhone button in iTunes:
-
Try the iTunes File menu > Devices. If you still do not see any devices in that File > Devices menu, it is likely that iTunes is having trouble recognizing your iPhone or iPad.
-
If iTunes is not recognizing your iPhone, here are Apple's suggestions on what do to if your device is not recognized.
-
In older iTunes prior to iTunes 12: In the upper-right corner of the iTunes window, you should see a button for one or more iOS devices. Press that button to bring up the summary page for your iPhone/iPad. If you do not see the button for your phone in the upper-right corner of iTunes, check to see if you have a list on the left-hand side of your iTunes window. If so, your phone should appear under "Devices" in that list. Click on the device name in order to bring up the information window for your iPhone/iPad.
Step 2: Press the Back Up Now Button
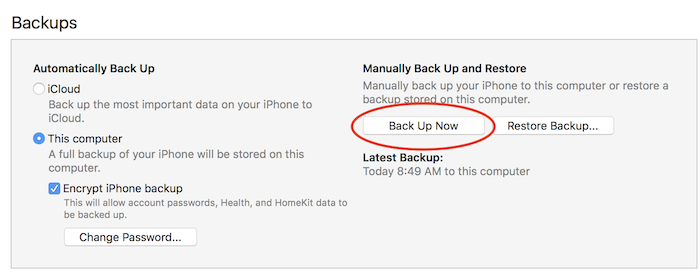
In the "Backups" section of the summary page, press the "Backup Up Now" button. This will backup to your computer regardless of your iCloud settings on the left. Our Decipher Tools software can read from both non-encrypted and encrypted backups (assuming you know the password!) so you can leave the encryption checkbox set however you like.

Note: Since iTunes 11 was released, many people see a screen that gives the option "Restore from Backup" or "Setup as New" when plugging in their iPhone for the first time. You want to choose the option "Setup as New." Even though this sounds like it might wipe the phone, it does not — it just sets up the phone as a "new" device in the list of devices that iTunes tracks. This should only happen the first time for each iOS device you plug in to the computer.
macOS Sonoma, Ventura, Monterey, Big Sur, and Catalina - How to back up your iPhone or iPad via the Finder
For Mac users running macOS Sonoma, Ventura, Monterey, Big Sur, or Catalina, iTunes is no longer needed and you can backup your iPhone, iPad, or iPod Touch device via the Finder.
- Plug in your iPhone or iPad to your Mac computer.
- Switch to Finder. It's usually the first item in your macOS dock.

The icon for macOS Finder. If you don't see the Finder icon in your dock, search for Finder in the Spotlight search in the upper right corner of your screen
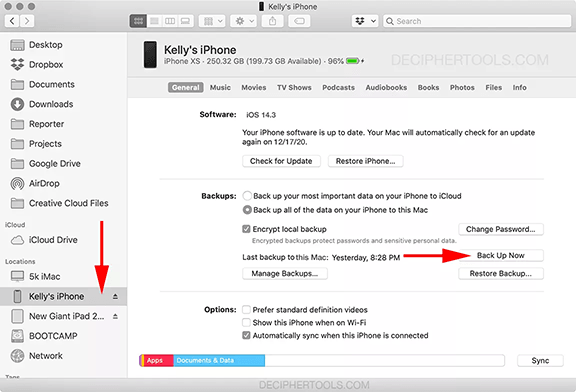
- In the left column of the Finder window, select your iPhone or iPad under Locations. If you don't see the left column of the Finder window, select the View menu > Show Sidebar.
- If prompted to "trust" the Mac on your device, tap Trust on your iPhone and enter the passcode as prompted. This is an iOS security mechanism to allow this Mac to connect to your iPhone.
- Click the button to "Back Up Now" under the main Finder window and "General" tab.
Here's a helpful screenshot for reference:

- You do not have to change the option next to "Backups:" in Finder.
- Turning on encrypted backups on your Mac by checking "Encrypt local backups" is optional as well. Encrypted backups are locked with a password, and include saved password data from your iPhone. If you turn on backup encryption, be sure to remember the password, because there is no password recovery mechanism.
Custom "Text Messages Only" Backup Option
When you use the custom "Text Messages Only" back up option within Decipher TextMessage, this feature will conveniently back up only the files relevant to your text messages. This backup option is useful if you don't have enough room on your computer to make a back up of your entire iOS device.

Instructions to make a "Text Messages Only" backup within Decipher TextMessage
-
Run Decipher TextMessage and plug in your iPhone.
-
Select the "Back Up" option in the menu of Decipher TextMessage. This will open a smaller window to make the text only backups.
-
Plug your iPhone in via USB and click the "Make Backup" button in the lower left corner of the window.
-
Be patient! The first step of an iPhone backup is iOS determining what files need to be backed up. iOS will then start sending the files from your device to the backup. Again, please be patient and give the program time to run.
-
The backup window will start filling up with messages relevant to the backup process. The Decipher TextMessage "text only" backup ignores data irrelevant to texts and when complete will not take up as much space as a normal backup.
-
When the backup completes, the last message in the window will say that the backup has finished successfully. If it says it finished with an error, please send the error message to us and we'll reply with help.
-
Click "Close Decipher TextMessage" and restart the program so that the software can read in your new backup.
-
Run Decipher TextMessage again and you'll now see your new backup in the left-hand column of program.
We also have a video walking through backing up only text messages data in Decipher TextMessage that you may find helpful!
Still having troubles backing up your iPhone on your computer?
If you have tried the options above and you are unable to backup your iPhone, contact us a via our support email and we'll reply back and help!


